Hedging in forex trading means adding an opposite position to reduce directional risk from an existing trade. The objective is usually capital preservation and flexibility—reducing exposure while you reassess the trade. When a hedge is applied, total exposure is reduced or temporarily neutralized.
In an app where each bot trades one direction on one pair, hedging is typically done by running two bots on the same pair in opposite directions, or by running separate bots on correlated pairs.
Hedging does not erase losses; it reduces sensitivity to further moves until you decide how to unwind the position. The drawdown at the moment you hedge becomes harder to recover quickly, because gains on one leg are often offset by losses on the other until you unwind. To free up capital and resume directional exposure, the trader will eventually need to release the hedge and decide how to realize or recover the remaining drawdown. Consequently, hedging is best framed as a temporary protection tool for situations where a trader expects a reversal or stabilization but prefers not to close the main position at a loss.
Hedging increases trading costs because the trader now carries two positions. This means paying spreads and commissions twice and potentially accruing swaps on both legs. Any forex hedging strategy must therefore balance protection benefits against the increased cost and operational complexity.
Not sure how bots work in Elirox? Start here: What is Elirox and how does it work.
A stop loss and a hedge can both limit risk, but they do so in different ways. A stop loss closes the position and realizes the loss at a predefined level. A hedge keeps the original position open and adds an opposite position to reduce exposure while you decide how to unwind.
Criterion | Hedge | Stop Loss |
|---|---|---|
Loss handling | Reduces exposure while keeping the original position open | Closes the position and realizes the loss |
Ongoing costs | Often higher (two legs → spreads/commissions, possible swaps) | Usually lower (one position) |
Complexity | Higher (needs an unwind plan) | Lower (decision is predefined) |
Best for | Temporary protection / flexibility | Clean risk cap / simple execution |
In short, a stop loss simplifies the book and crystallizes risk, whereas a hedge preserves optionality to re-enter the trend without realizing the loss immediately. The trade-off is higher running costs and the challenge of deciding when and how to release the hedge.
Retail hedging revolves around spot FX positions and, where accessible, CFDs. Three common approaches are used: the perfect hedge on the same pair, the multi-pair hedge basket, and the hedge grid. In some jurisdictions (notably the U.S.), broker rules may require FIFO-style position handling, which can restrict holding opposite positions on the same pair. Always check your broker’s rules.
The perfect hedge is straightforward: run two positions on the same instrument—one long and one short—with the same volume. In a single-pair bot setup, this usually means launching two bots on the same pair, one configured long and the other short. This can make the combined exposure close to neutral (depending on sizing and execution). The concept “perfect hedge same pair” is appealing because it is simple and intuitive: once the hedge is placed, further adverse movement does not worsen the drawdown.
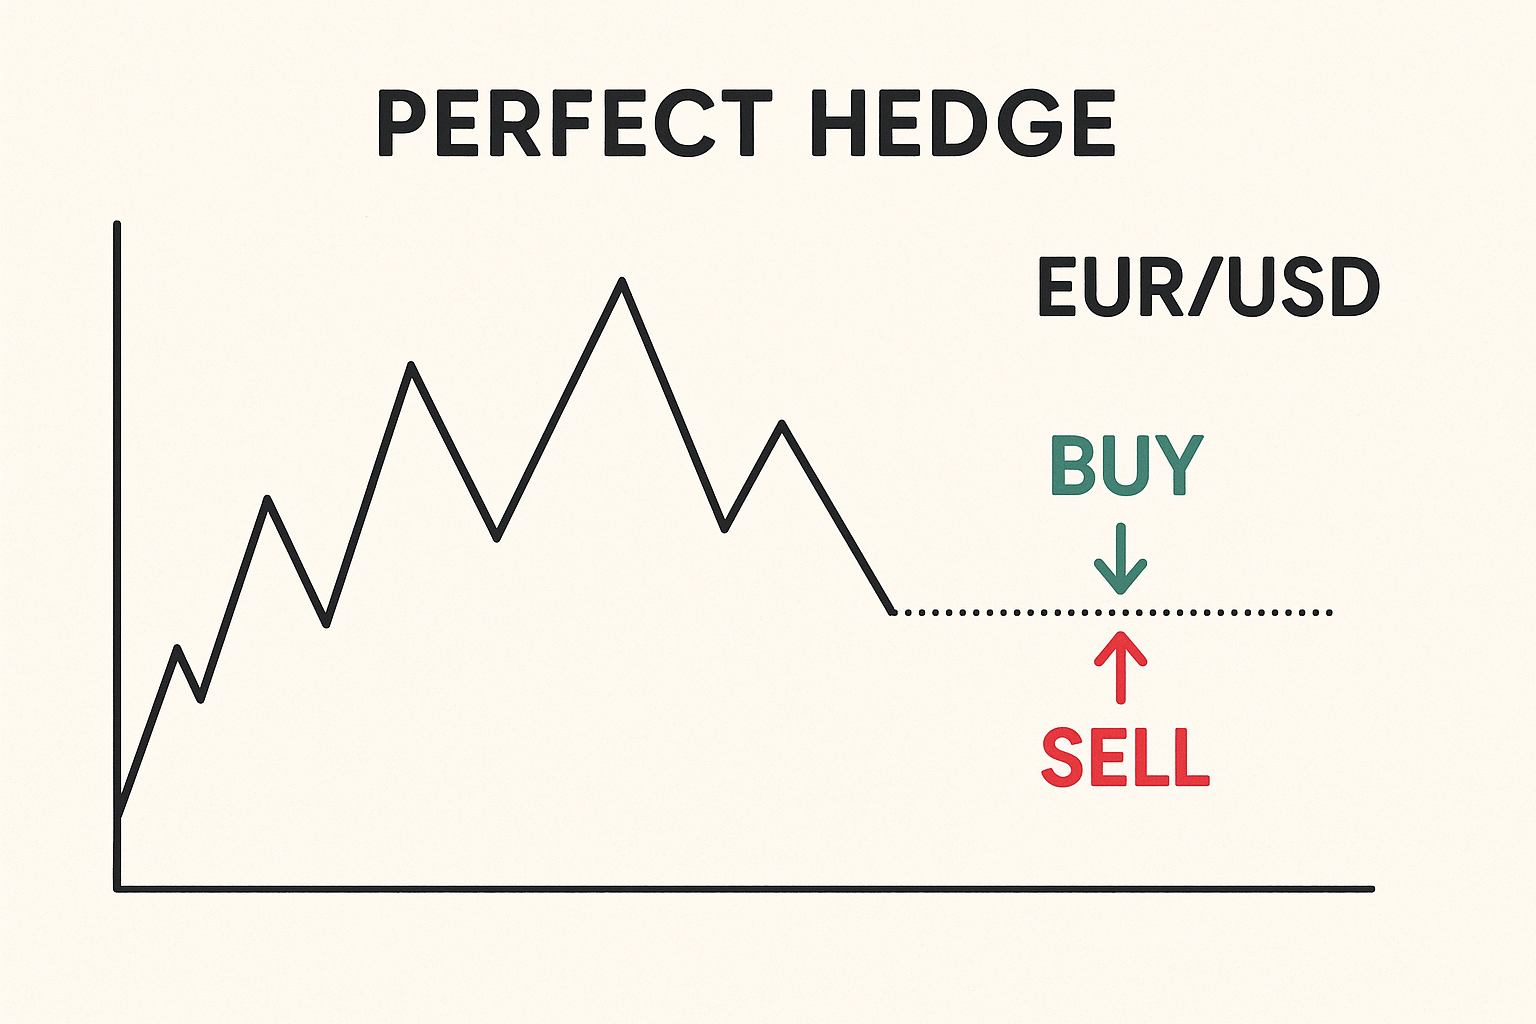
However, this method increases costs immediately. You pay two spreads or commissions and potentially two swaps. The locked loss persists and ties up margin, and you still need a plan to release the hedge later. In some jurisdictions (notably the U.S.), broker rules may restrict holding opposite positions on the same pair. Always check your broker’s rules.
Practical management considerations:
To learn how to start running bots on Elirox, see: How to start trading with Elirox.
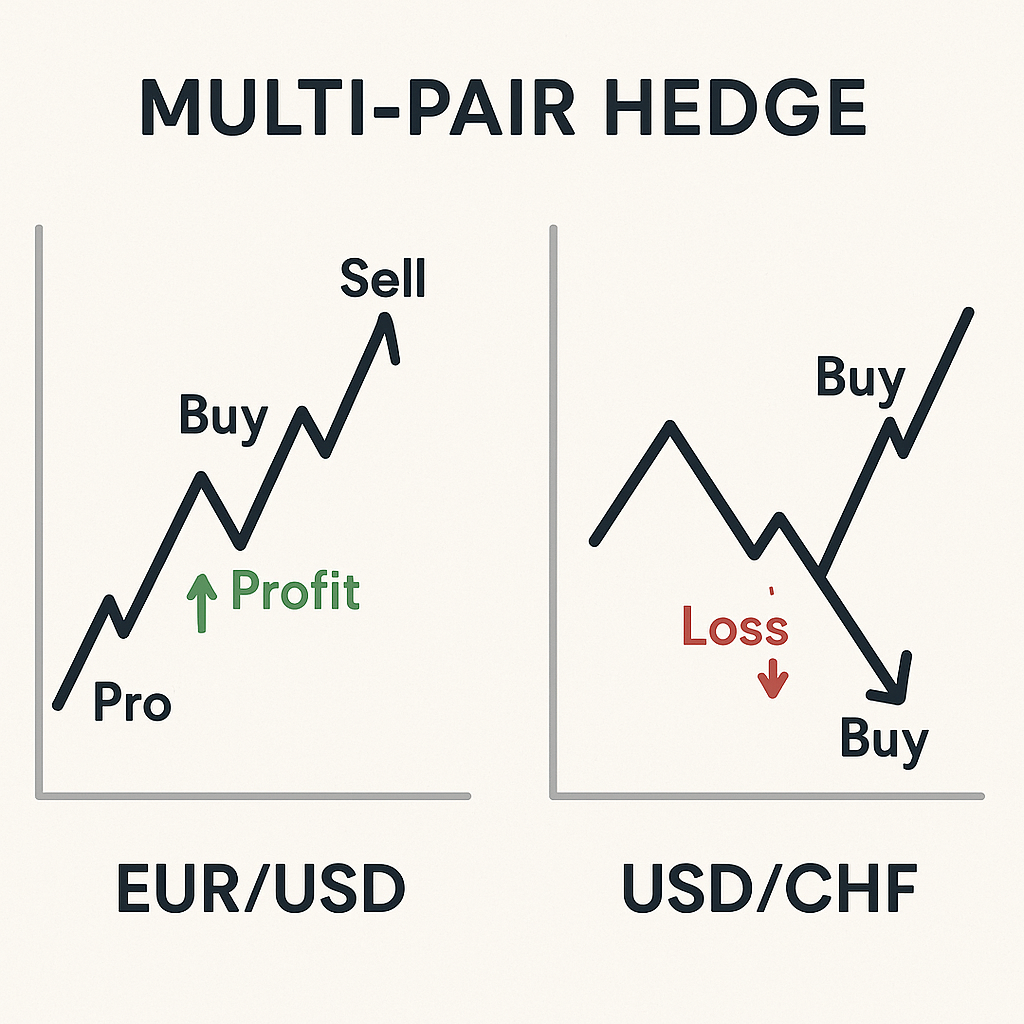
A multi-pair hedge mitigates risk on one pair via a correlated or inversely correlated pair. For example, if you are long EUR/USD, you might short USD/CHF (inverse correlation) or short GBP/USD (positive correlation with EUR/USD but used to dampen overall USD-factor risk). The “multi-pair hedge basket forex” approach is often allowed where same-pair hedging is restricted.
Key points for basket construction:
In a bot-based workflow, this typically means running separate bots on different pairs, with each bot managing one leg.
A hedge grid spaces opposite orders at predefined intervals to average exposure across a price range. For instance, a trader might hold a core long and add offsetting short orders every 50–80 pips on adverse movement, or run symmetrical buy/sell grids that alternate exposure. Hedge grids can resemble recovery-style systems and can become complex quickly, so they require strict limits and a clear exit plan. In a single-pair bot setup, grids are typically handled by a dedicated grid bot rather than mixing logic inside a hedge.
Considerations and risks:
Used judiciously, grids can smooth entry and exit, but they are not a substitute for a directional view and a disciplined release plan.
Professionals may hedge with instruments like forwards and options. Those tools can be more precise, but they’re outside the scope of most retail FX apps—so this guide focuses on spot-style hedging you can approximate with multiple single-pair positions.
Costs and execution are the make-or-break factors for hedging. Any trader considering hedging must weigh hedging risks costs forex alongside the perceived benefits. Costs accumulate quickly, and operational errors during hedge release can turn a controlled drawdown into realized loss.
Hedging doubles the number of open positions. That means spreads, commissions, and swaps are generally incurred on both legs. In quiet markets, this may seem manageable; in volatile or illiquid hours, spreads can widen and swaps can be punitive for extended holds. Always model the time component: a hedge can reduce exposure, but financing and spread costs can add up quickly if held for days.
Cost Type | Impact on Hedging |
|---|---|
Spread | Paid on both legs when opening/closing; spread widening during low-liquidity hours increases costs |
Swap | Charged on both positions; may be negative on both sides; triple swap on certain days amplifies the effect |
In addition to spreads and swaps, many brokers charge per-trade commissions. By definition, hedging doubles trade count and therefore doubles commissions. Include these in your breakeven math.
Running two bots effectively increases trading activity, so spreads/commissions and potential overnight costs can add up faster than expected.
Even when net exposure is near zero, both legs can consume margin. Some brokers offer margin relief for fully hedged same-pair positions, while others do not, and same-pair hedges may be prohibited in certain jurisdictions (e.g., FIFO-style rules in some jurisdictions). In multi-pair baskets, margin usage is additive because legs are on different instruments, and correlation does not reduce margin.
Locked losses reduce free margin and can precipitate margin calls if volatility rises. If the market trends against the primary position for an extended period, the hedge might protect equity swings but still erode usable margin via swaps and widening spreads. Always monitor:
Releasing the hedge is the hardest part. The goal is to resume the main trade without letting the locked loss balloon into a realized one. Approaches include:
No approach is risk-free. If the market whipsaws, you can realize losses on the hedge while the original position remains underwater. Plan the decision tree in advance, including maximum hold time and maximum cost budget. Remember: the locked losses must be covered at some point to free capital.
A concise hedging example forex helps clarify mechanics. Below is a step-by-step scenario on EUR/USD, illustrating entries, the hedge, and release logic with costs.
Notes on management:
This example underlines the essential principles: hedging locks losses, increases costs, and requires a predefined release plan. Without these, the hedge can prolong a losing situation while capital erodes through spreads, commissions, and swaps.
A forex hedging strategy aims to protect capital during adverse moves, not to engineer risk-free profit. The technique can be effective when a trader expects a reversal but prefers not to close the main position, yet it introduces higher costs, operational complexity, and the difficulty of timing the release. In some jurisdictions, broker rules may restrict holding opposite positions on the same pair, which makes multi-pair baskets or grid-based methods more relevant.
Hedging does not remove losses; it locks them, consumes margin, and doubles commissions, spreads, and often swaps. If you choose to hedge, do so with clear rules for entry, cost budgeting, and release confirmations. Used within a disciplined risk framework, a forex hedging strategy can serve as a temporary shield—one that buys time to navigate volatility while keeping capital preservation at the forefront.
Want to explore automated trading strategies in a risk-free environment first? Start with $10,000 in virtual funds: How to use a demo account.