By the Elirox Team · Updated May 2026
Grid Trading Strategy Forex — Elirox Guide
Grid trading forex is a rules-based approach that places a series of buy and sell orders at predefined price intervals, forming a “Grid” above and below the current market price. Instead of trying to predict the next tick, the strategy monetizes normal price oscillations: as price moves, positions are opened and closed at incremental profits according to the Grid’s structure.
What is Grid Trading in Forex?
Grid trading forex is a rules-based approach that places a series of buy and sell orders at predefined price intervals, forming a “Grid” above and below the current market price. Instead of trying to predict the next tick, the strategy monetizes normal price oscillations: as price moves, positions are opened and closed at incremental profits according to the Grid’s structure.
A simple analogy is a fishing net stretched across different depths in the water. Each knot in the net is a price level. Whether the “fish” (price) moves up or down, the net is ready to catch movement by triggering orders at those levels. In markets like EUR/USD that often range for extended periods, a properly configured Grid can harvest small, repeated profits from mean-reversion and short swings.
Key characteristics:
- A predefined interval between order levels (Grid spacing)
- A consistent rule for lot size and the number of levels
- Clear profit-taking and, critically, well-defined exit/stop logic to cap downside
The core objective is consistent execution, not directional forecasting. Because Grids can accumulate multiple open positions, strict risk management is non-negotiable.
How Does a Forex Grid Strategy Work?
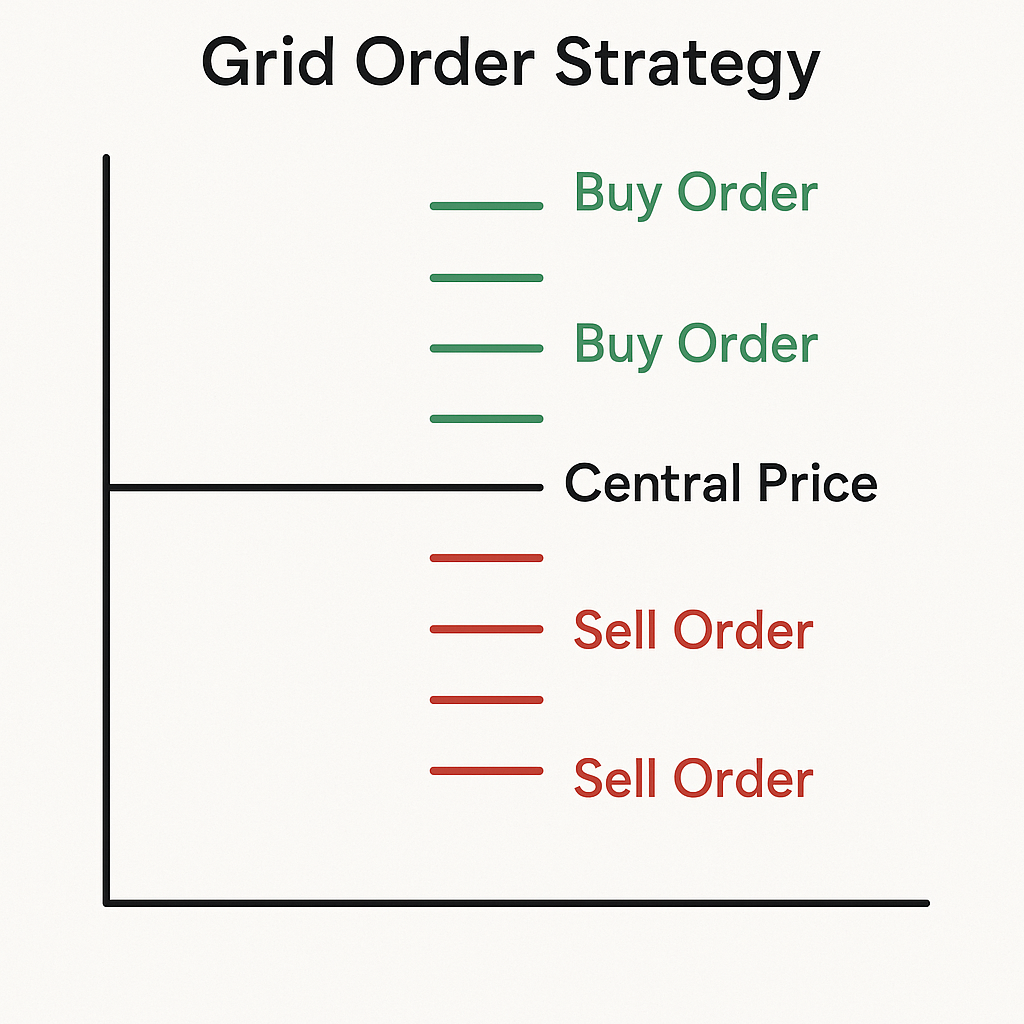
At its core, a forex Grid strategy uses pending orders at fixed price intervals. Traders define a central reference price (e.g., the current market or a recent average) and place a series of orders “every X pips” above and below that price. Depending on the logic, these orders can be:
- Limit orders to fade moves (buy limit below, sell limit above)
- Stop orders to join breakouts (buy stop above, sell stop below)
Mechanism overview:
- Choose grid spacing (e.g., 20–50 pips), calibrated to the pair’s recent price ranges on your execution timeframe.
- Place symmetrical buy and sell pending orders at each Grid level.
- Attach a take-profit to each order (and, ideally, a stop-loss or hard equity stop).
- When price hits a level, the order executes. As price retraces or continues, positions close at predefined profits while new orders can be added at the next levels.
- The process repeats, capturing incremental gains across oscillations.
Example with EUR/USD:
- Central price: 1.0900
- Grid spacing: 30 pips
- Orders: Buy limits at 1.0870, 1.0840, 1.0810; Sell limits at 1.0930, 1.0960, 1.0990
- Take-profit: 15–25 pips per leg (half to near-full spacing)
- Stop-loss or exit logic: hard stop beyond a “disaster level,” or an equity-based stop that cuts the entire Grid if drawdown hits a predefined threshold
This structure defines when and where trades occur, while strict controls define when risk is cut.
Key Components of a Grid System
- Grid Spacing: The distance in pips between orders. Tighter spacing increases trade frequency and potential profit density but raises the chance of accumulating too many positions during trends. Wider spacing reduces trade count but gives more room against noise. A practical method is to link spacing to volatility by referencing recent candle ranges on your execution timeframe (manual). If current candles are consistently larger than usual, widen spacing; if ranges are compressed, spacing can be tighter.
- Lot Size: Start small. Many successful practitioners risk a fraction of a percent per filled level (e.g., 0.1–0.25% of account per leg), accounting for the fact that multiple legs can be open concurrently. Lot size should also reflect margin availability and the maximum number of levels you allow to activate.
- Take Profit / Stop Loss: Attach a realistic take-profit calibrated to spacing (for instance, 50–80% of spacing). Set a stop-loss per position, a “disaster” stop for the outermost level, or at minimum an equity stop that closes the Grid if account drawdown breaches a pre-set limit (e.g., 8–12%). Without disciplined exits, the Grid’s risk can compound quickly.
To configure your Grid bot settings step by step, see: Customize GRID bot parameters.
Types of Forex Grid Strategies
A Grid trading strategy forex can be adapted to different market behaviors—ranging, trending, or volatile breakouts. The primary categories revolve around order type (limit vs. stop), directional bias (with trend vs. countertrend), and money management approach.
Below are commonly used variants within the broader forex Grid strategy family and how they behave.
Hedging Grid Strategy (Hedged Grid Forex)
A hedged grid conceptually places buy and sell orders around price, but in our app you cannot run long and short in the same bot. If you want a hedged grid on the same pair, you would run two separate bots: one long-only grid and one short-only grid, each with its own max levels and kill-switch.
Typical implementation:
- Above price: a ladder of sell limits (fade rallies) or buy stops (join breakouts)
- Below price: a ladder of buy limits (fade dips) or sell stops (join breakdowns)
- Each triggered order has its own take-profit; some traders pair opposing legs and close them as a net basket once a combined profit target is reached
Logic:
- In range conditions, alternating up/down moves trigger and then exit successive legs for small gains.
- A hedged Grid forex setup can reduce directional bias but still accumulates exposure when price trends persistently in one direction. Therefore, it requires strict caps on the number of active levels, well-defined exits, or emergency hedges (e.g., a temporary trend-following position outside the Grid) to control drawdown.
Example:
- EUR/USD at 1.0900, spacing 25 pips
- Sell limits at 1.0925/50/75; buy limits at 1.0875/50/25
- TP 12–18 pips per leg; equity stop at 10% account drawdown; max active legs per side: 4
- News filter disables new orders around high-impact releases
Straight Grid vs. Reverse Grid
- Straight Grid (with the trend): Uses stop orders to join momentum. Buy stops are placed above price; sell stops below. This design tries to ride breakouts and can be effective in trending markets, but whipsaws can cause clusters of small losses.
- Reverse Grid (against the trend): Uses limit orders to fade moves. Sell limits above price; buy limits below. This works best in stable ranges with mean-reversion characteristics. The main hazard is a strong, sustained trend that keeps filling new levels against the move.
Choosing between straight and reverse Grids depends on market regime:
- If candle ranges are expanding sharply, macro catalysts are active, or higher-timeframe structure shows strong directional bias, a straight grid may be safer.
- In overlapping sessions with contained volatility and clear horizontal ranges, a reverse Grid can harvest oscillations efficiently—provided drawdown limits are enforced.
Grid Strategy vs. Martingale
Before looking at the comparison, note that many traders search for “Grid vs martingale forex” because both can scale exposure as price moves. However, their logic and risk profiles differ meaningfully.
| Aspect | Grid Strategy | Martingale |
|---|
| Overall logic | Predefined levels enter and exit in increments to monetize oscillations; can be with trend (stops) or against trend (limits). | Double size after losses to recover prior losses with one win; typically direction-agnostic and focused on payoff geometry. |
| Lot sizing rule | Usually fixed or modestly adaptive per level (small lots across multiple legs). | Progressively increases lot size after each loss (exponential growth). |
| Risk profile | Concentrated in sequences of one-way moves; manageable if capped by strict level limits and equity/price stops. | Tail risk escalates rapidly; a long loss streak can trigger outsized positions and catastrophic drawdowns. |
| Typical exit | Per-leg take-profits or basket targets; optional disaster stop or equity stop. | Exit after a single win recovers prior losses; often lacks predefined hard stop, heightening blow-up risk. |
| Failure mode | Persistent trends fill levels against the move; without strict controls, drawdown compounds. | Extended loss streak forces huge position sizes, risking margin call. |
| Risk control | Small lot sizes, max levels, volatility-based spacing, equity stop, and news filters. | Rarely compatible with conservative risk limits due to exponential sizing. |
The Anti-Martingale Approach (Anti-Martingale Grid)
The anti-martingale Grid scales exposure with winning trades and reduces or caps risk after losses. In practice:
- When a leg closes in profit, you may allow a slightly larger size for subsequent legs in that direction, or pyramid only in realized-profit units.
- After a losing sequence, you cut size or pause new entries until drawdown recovers.
This approach aligns risk with favorable conditions instead of fighting adverse runs, and it complements Grids that adapt to trend continuation while keeping overall exposure bounded.
Setting Up a Profitable Grid Strategy (Grid Settings Forex)
The key to practical implementation lies in disciplined preparation. Grid settings forex best practices include aligning spacing with volatility, predefining level counts, sizing positions conservatively, and hard-coding exits for worst-case scenarios.
Framework:
- Define the market regime you want (range or trend).
- Choose appropriate instruments (e.g., liquid majors like EUR/USD) with tight spreads.
- Set spacing relative to volatility and session behavior.
- Start with small lots; cap maximum simultaneous levels.
- Predefine take-profits, stops, and equity-based kill-switches.
- Validate the setup in a demo environment or with very small size first, and track results over a meaningful sample.
Choosing the Right Market Conditions and Timeframe
- When to apply: Grids generally perform better in ranges. Look for horizontal support/resistance, compressing volatility after big moves, and sessions with mean-reverting characteristics (e.g., Asian range on EUR/USD).
- When to avoid: Strong trends, news-driven conditions (e.g., NFP, FOMC, ECB), or times when ATR is expanding sharply. A single breakout can stack multiple adverse legs quickly.
- Timeframe: Execution often occurs on M15–H1 for intraday Grids or H1–H4 for swing Grids. Analyze ATR on your execution timeframe and one level higher to avoid spacing that’s too tight for prevailing volatility.
- Filters: Consider using a moving-average slope and simple structure cues (higher highs/lows or lower highs/lows on H1/H4) to avoid running countertrend grids during strong directional conditions. Treat this as manual confirmation unless your app supports it directly.
To learn when the Elirox bot is active and which sessions it trades, see: What are trading hours.
Best Grid Spacing Settings
There is no universal spacing; it must fit volatility, spread, and your risk budget.
Guidelines:
- For liquid majors (EUR/USD), typical spacing ranges from 20 to 50 pips.
- Tighter spacing (e.g., 20–25 pips) increases fill frequency and profit density but heightens clustering risk in trends.
- Wider spacing (e.g., 40–50 pips) reduces fill frequency but gives more room and lowers correlation between levels.
A practical approach is
A practical approach is range-anchoring:
- Spacing should be large enough that normal pullbacks don’t fill multiple levels too quickly.
- Use recent candle ranges on your execution timeframe as a reference: if candles are larger than usual, widen spacing; if ranges are tight and stable, spacing can be tighter.
- TP is often set as a fraction of spacing (e.g., 50–80%) so exits happen without needing a full reversal.
Example spacing choices on EUR/USD:
- 20 pips in very quiet Asian sessions with spreads ≤1 pip
- 30 pips in normal conditions
- 50 pips when volatility expands (post-news), or for higher-timeframe Grids
Below is an example configuration.
| Pair | Grid Spacing | Initial price | Number of orders | Total exposure |
|---|
| EUR/USD | 30 pips | 1.0900 | 12 (6 above, 6 below) | 0.60 lots total if each level is 0.05 lots |
Interpretation:
- With 0.05 lots per level and 12 maximum levels, your peak exposure is 0.60 lots. Confirm that margin and drawdown tolerances accommodate this load before live trading.
Risk Management and Position Sizing
Risk control is the centerpiece of any Grid. Guidelines used by many experienced practitioners:
- Small per-level risk: Keep each leg’s risk small (e.g., 0.1–0.25% of equity per filled position). Assume several legs may be open simultaneously when sizing.
- Cap the Grid: Limit the maximum number of active levels per side (e.g., 4–6 intraday, 8–12 swing). If the limit is hit, stop adding and consider partial hedges or reducing exposure.
- Use explicit exits: Combine per-leg stop-losses with an account-level equity stop (e.g., close all if drawdown reaches 8–12%). If you prefer no per-leg SL, a hard disaster stop beyond the outermost level is still essential.
- Volatility-aware spacing: Expand spacing when recent candle ranges expand to reduce clustering of adverse fills; compress spacing only in quiet conditions.
- Margin safety buffer: Maintain free margin well above broker call thresholds (e.g., aim to keep ≥70–80% free margin during normal operations).
- News and session filters: Disable new orders ahead of high-impact events and during illiquid rollovers. Allow only exits to execute during these windows.
Concrete example:
- Account: $10,000; risk tolerance: 10% max equity drawdown for the entire Grid
- Levels: 10 maximum at 0.05 lots each
- If worst-case adverse move threatens to fill all 10 levels, ensure the potential mark-to-market loss at the defined “disaster distance” remains under $1,000. If not, reduce lot size or number of levels, widen spacing, or all three.
Grid Trading Risks (Grid Trading Risks Forex)
Objectivity demands highlighting where Grids can fail. The main risks are trend persistence, volatility spikes, and leverage. To address Grid trading risks forex effectively, traders must assume adverse sequences will occur and pre-commit to exits that protect capital.
Key principles:
- Always plan for a one-directional move that fills multiple levels.
- Quantify worst-case scenarios before trading.
- Trade small and accept that sitting out hostile market regimes is part of the strategy.
The Risk of Strong Trends and Drawdown
A persistent directional move is the classic failure mode. For instance, a reverse Grid on EUR/USD with 30-pip spacing can accumulate several short positions if price rallies 300 pips without meaningful pullback. Each additional leg increases exposure and unrealized loss, creating a deep drawdown.
Mitigations:
- Regime filter: Disable countertrend grids when higher-timeframe structure is directional and the moving average slope is clearly trending
- Disaster stop: Place a hard stop beyond the furthest planned level to cap losses if the trend doesn’t mean-revert.
- Equity stop: Close the entire basket at a predefined drawdown (e.g., 8–12%). This prevents a survivorship-bias trap of “just one more level.”
- Adaptive spacing: Expand spacing when candle ranges expand to slow the rate of new fills.
- Time-based exits: If positions remain open beyond a maximum duration, reduce or flatten rather than hoping for reversion.
Margin Call and Overleveraging
Overleveraging turns a manageable drawdown into a margin event. As multiple Grid legs fill, margin usage compounds. If free margin falls below broker thresholds, positions can be forcibly liquidated at the worst time.
Best practices:
- Start with small lots and assume the full Grid can be active during stress.
- Calculate margin use per leg and total potential usage with maximum levels. Ensure free margin remains ample (target ≥70–80% in normal conditions).
- Use a conservative leverage ratio. Even if your broker offers 1:500, sizing as if you had 1:30 or 1:50 can keep the account resilient.
- Implement a daily loss cap and an equity kill-switch for the entire strategy.
Illustration:
- Margin use varies by broker and instrument. Before running a grid, estimate worst-case margin usage if all planned levels fill, and keep a conservative free-margin buffer so a spike doesn’t force liquidation.
Automating Your Grid Strategy: EAs and Bots
In our app, grids are typically implemented using bots with predefined spacing, max active levels, and a hard drawdown kill-switch. Automation improves consistency—but it also executes mistakes consistently, so risk limits matter more than “perfect” parameters.
If you evaluate the strategy historically or in a demo environment, include realistic spreads, swaps, and slippage, and judge performance across different regimes (ranges, breakouts, trends), not only on one favorable month.
To see exactly how the Grid strategy works inside the Elirox app, visit our guide: Trading strategies: GRID.
Pros and Cons of Using a Grid EA/Bot
Pros:
- Consistency: Executes rules objectively, without hesitation or fatigue.
- Coverage: Monitors multiple symbols and sessions simultaneously.
- Speed: Places, modifies, and closes orders instantly when conditions are met.
- Safety features: Can enforce equity stops, max-level caps, and news filters reliably.
Cons:
- Blind execution: If market regime changes suddenly, the EA may continue operating unless you’ve built strong filters and kill-switches.
- Over-optimization risk: Curve-fitted parameters may fail out-of-sample.
- Technical dependencies: Requires stable connectivity, VPS, and broker infrastructure.
- Complexity of edge cases: Handling gaps, off-quotes, or symbol-specific quirks needs careful coding and testing.
Conclusion: Is the Grid Trading Strategy Right for You?
Grid trading forex can harvest frequent, incremental profits in the right conditions, but it concentrates risk during persistent trends. If you pursue a Grid trading strategy forex, do so with humility toward risk: small lot sizes, capped levels, an equity kill-switch, disaster stops, and robust market filters. Favor liquid pairs like EUR/USD, calibrate spacing to volatility, and avoid high-impact news windows.
The right question is not “How much can a Grid make?” but “How much can it lose, and how will I stop it?” Your final step before committing capital is thorough backtesting and forward-testing under varied regimes—quiet ranges, volatile expansions, and trend environments. Only with quantified expectations and disciplined controls can a Grid contribute sustainably to your trading process.
New to Elirox? Test your Grid strategy with $10,000 virtual funds before going live: How to use a demo account.
Disclaimer: This article is for educational purposes only and does not constitute financial advice.