By the Elirox Team · Updated April 2026
Forex Breakout Strategy — Elirox Guide
A forex breakout strategy seeks to capture directional price moves that begin when market price pushes beyond a well-defined support or resistance boundary and sustains trading outside that area. The logic is structural: a level that previously capped price action (supply or demand) is overcome, revealing imbalance and releasing pent-up orders. In liquid FX pairs, these imbalances often coincide with session transitions, macro catalysts, or the completion of consolidation phases.
Breakout setups are built on support and resistance — see the Support & Resistance Forex Strategy guide.
What is a Breakout Trading Strategy in Forex?
A forex breakout strategy seeks to capture directional price moves that begin when market price pushes beyond a well-defined support or resistance boundary and sustains trading outside that area. The logic is structural: a level that previously capped price action (supply or demand) is overcome, revealing imbalance and releasing pent-up orders. In liquid FX pairs, these imbalances often coincide with session transitions, macro catalysts, or the completion of consolidation phases.
A breakout is not merely an intrabar excursion; it requires evidence that the market accepted price beyond the boundary. Professional traders therefore define the level precisely, wait for a decisive close outside the level, and then demand confirmation that the new territory is being defended. This approach filters much of the “noise” that routinely produces traps.
New to Elirox? Learn how the platform works before applying these strategies: What is Elirox and how does it work.
Identifying Key Support and Resistance for Breakouts (Support Resistance Breakout)
Effectiveness begins with clean levels. A clean level is one that:
- Has been respected multiple times (at least two strong touches; three or more is better).
- Is visible across timeframes (drawn on higher timeframes and refined on the trading timeframe).
- Aligns with structural context (swing highs/lows, prior range extremes, neckline of a pattern).
- Shows clear reactions when tested (impulsive rejections, increased wick length at the boundary).
- Often coincides with round numbers or previous session highs/lows.
Practical steps for defining levels:
- Start on the daily or 4-hour to draw major swing highs and lows. These are the “map.”
- Refine on the 1-hour or 15-minute to pinpoint the actionable boundaries for execution.
- Prefer flat, horizontal levels for clarity over diagonals when learning. Trendlines can be used, but they introduce slope subjectivity.
- Consider the context: a level created by a sharp, one-sided move tends to contain resting stop orders and fresh interest the next time it is tested, creating a potential focal point for a support resistance breakout.
Confirmation starts with the close outside the boundary. However, the higher-probability execution usually follows on the retest, when former resistance turns into support (or vice versa), and the market proves it can defend the new structure.
The Break and Retest Strategy (Break and Retest Forex)
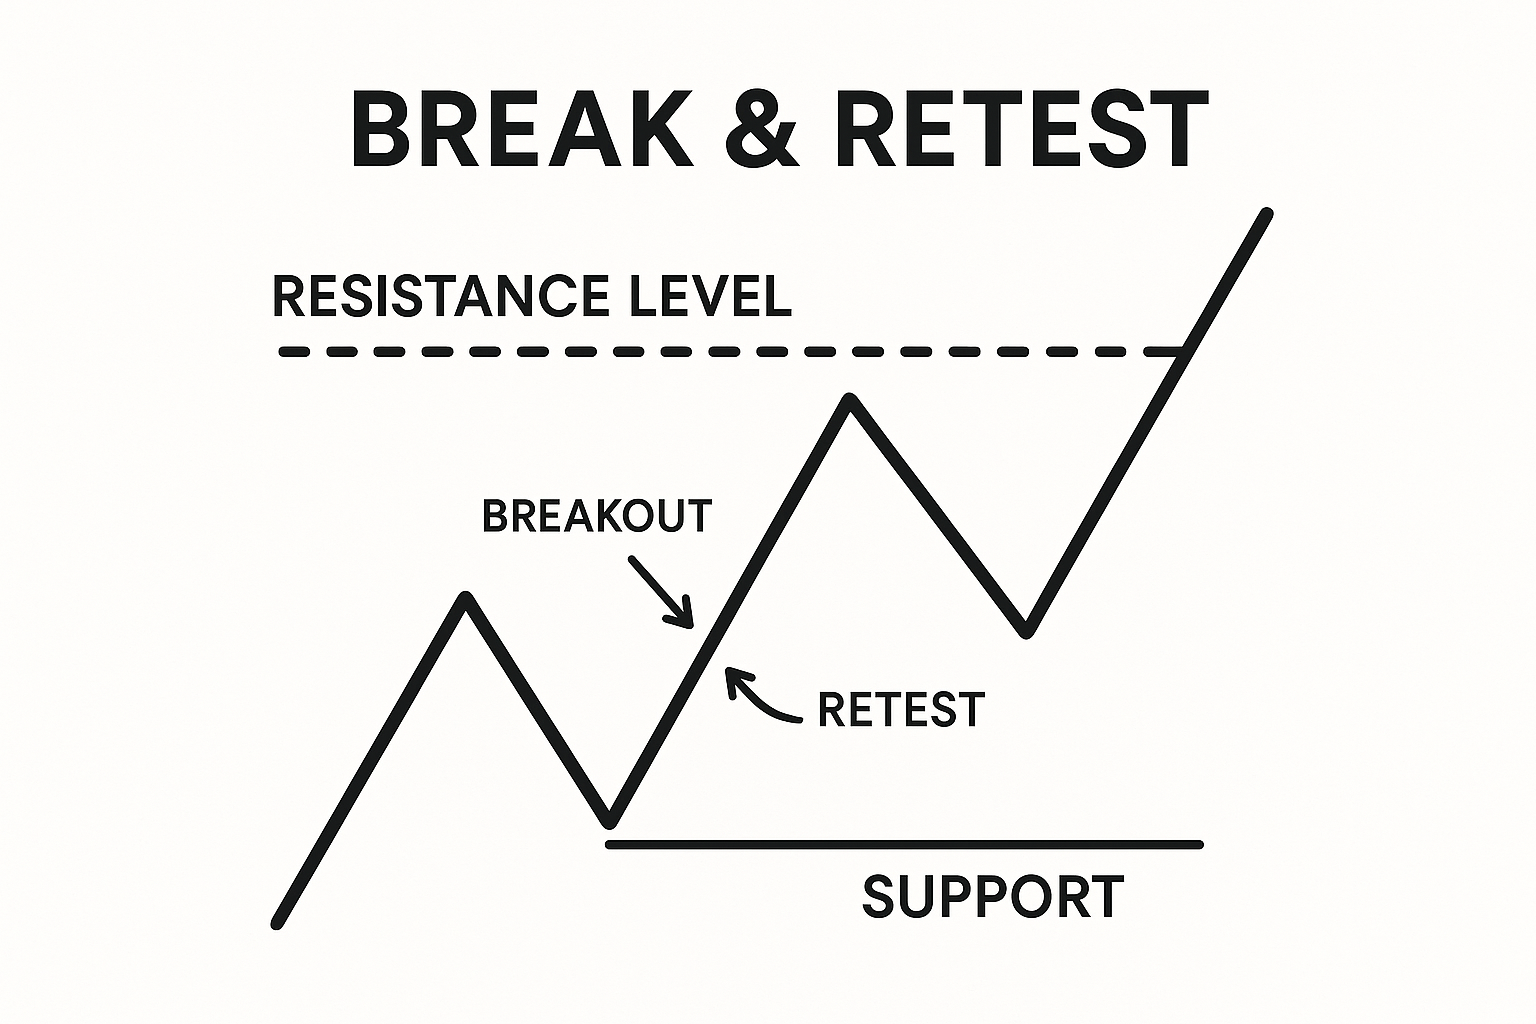
Among breakout methods, the break and retest forex approach stands out for its emphasis on proof. Rather than chasing the initial thrust, you wait for price to return to the broken level and confirm that it now acts as a barrier in the opposite direction. This is safer because:
- It reduces the likelihood of buying into an exhaustion move.
- It compels the market to show acceptance beyond the level (close outside) and then evidence of defense (successful retest).
- It naturally defines risk: the invalidation is on the other side of the reclaimed level, allowing precise stop placement.
Core execution sequence:
- Identify a clean horizontal boundary (well-tested high or low).
- Wait for a decisive close beyond the level on your trading timeframe.
- Do not enter immediately. Allow price to pull back to the level.
- On the retest, demand confirmation (price reaction, candle pattern, or momentum agreement).
- Enter with the stop loss beyond the level on the opposite side.
- Manage the trade with predefined risk-to-reward and measured targets.
Why candle close matters:
- Intrabar volatility often pierces levels and retracts quickly. Requiring a close outside significantly lowers false triggers.
- The body of the candle should show intent (e.g., closes at least several pips beyond the boundary for the pair’s volatility regime).
Risk parameters:
- Stops belong beyond the broken level, not at the level. For a bullish breakout of resistance, place the stop below the reclaimed area; for a bearish breakout of support, place it above. This acknowledges normal noise on retests.
- Position sizing must be derived from stop distance and a fixed percentage risk per trade (e.g., 0.25–1.0%).
- Targeting can follow structure (prior swing / next key level) or a measured objective such as projecting the height of the prior range from the breakout point.
Timeframe considerations:
- Higher timeframes (H4/D) produce fewer but more reliable signals and cleaner retests.
- Intraday (M15–H1) offers more occurrences but requires stricter confirmation and disciplined news filters.
Trading the Retest (Breakout Pullback Forex)
The principle is straightforward: former resistance becomes support; former support becomes resistance. This structural flip is the essence of a breakout pullback forex entry. On the retest, you want to see the market test into the broken level and respond with buying (for bullish setups) or selling (for bearish setups).
Execution details:
- Entry style: You can use a limit order at the level, or a confirmation entry after a qualifying candle forms on the retest (e.g., bullish rejection for longs). Confirmation entries filter noise but may sacrifice a few pips.
- Retest depth: Shallow retests show strength; deep retests that close back through the level are warnings. Wicks penetrating and closing back in your intended direction are acceptable; full closes beyond the invalidation level are not
- Structure: Look for higher lows forming above reclaimed support (bullish) or lower highs below reclaimed resistance (bearish). This suggests that participants are defending the level.
Stops and targets:
- Stop loss: Always place it on the other side of the reclaimed level. If the level is 1.1000 and you’re long after a break above, a logical stop is a few pips below 1.1000, with extra room for typical wicks and the pair’s spread (based on recent price behavior, not indicators).
- Targeting: Commonly the next liquidity pool (prior high/low, range boundary), or a multiple of risk (at least 1:2 R:R). Scaling out at interim structure points can reduce variance.
Trade management:
- If price hesitates at the level with multiple indecisive candles and reduced range, consider standing aside. Patience prevents overtrading the retest.
- If the retest fails and price closes back inside the old range, exit promptly; the thesis is invalidated.
Confirmation Techniques on Retest (Breakout Confirmation Forex)
Confirmation is non-negotiable. For breakout confirmation forex, align price action and simple indicators on the retest to upgrade odds and define risk tightly.
Typical confirmation signals:
- Candlestick: Pin Bar/Hammer, Shooting Star, Engulfing, or strong rejection candle at the level.
- Momentum/structure: RSI regime (above 50 bull / below 50 bear) or clear price acceptance above/below the level on the retest.
- Multi-timeframe: A retest signal on M15 that aligns with a bullish H1 close outside the level increases quality.
- Market context: Avoid trades minutes before high-impact news; favor periods with sufficient liquidity.
| Checklist item | What to confirm | Complete (Y/N) |
|---|
| Level quality | Level has 2–3+ prior touches, clear reactions, visible on higher timeframe | |
| Decisive break | Candle close beyond level (body outside), not just a wick pierce | |
| Retest behavior | Price returns to level; forms wicks/rejection in breakout direction; holds above/below | |
| Candlestick signal | Pin Bar, Engulfing, or strong rejection candle at the level | |
| Momentum alignment | RSI regime (above 50 bull/below 50 bear) or MACD turn aligns with setup | |
| Risk placement | Stop loss on the other side of the broken level; size position accordingly | |
| Reward framework | Planned target at next structure or >= 1:2 R:R; avoid trading into nearby obstacles | |
| News filter | No imminent high-impact events that could distort the retest | |
| Session/liquidity | Execution aligned with liquid hours for the pair; avoid illiquid transitions | |
| Documentation | Screenshot and notes of level, break, retest, and rationale before entry | |
Execution refinements:
- Candle body > wick: On the break candle, a larger body indicates genuine initiative. On the retest candle, a rejection wick with a favorable close is preferred.
- Time allowance: If price doesn’t retest within a reasonable number of candles, skip. Late retests after extended runs are lower quality.
- Partial entries: If uncertainty remains, consider a half-size position on the initial signal and add on further confirmation, keeping total risk constant.
Avoiding the Trap: False Breakouts (Breakout False Break Forex)
False breaks are common in FX due to liquidity hunting, session overlaps, and news impulses. A disciplined process treats every breakout as suspect until proven. The best defense is to wait for the retest, demand confirmation, and place the stop loss on the other side of the level. This is the essence of robust risk control for breakout false break forex scenarios.
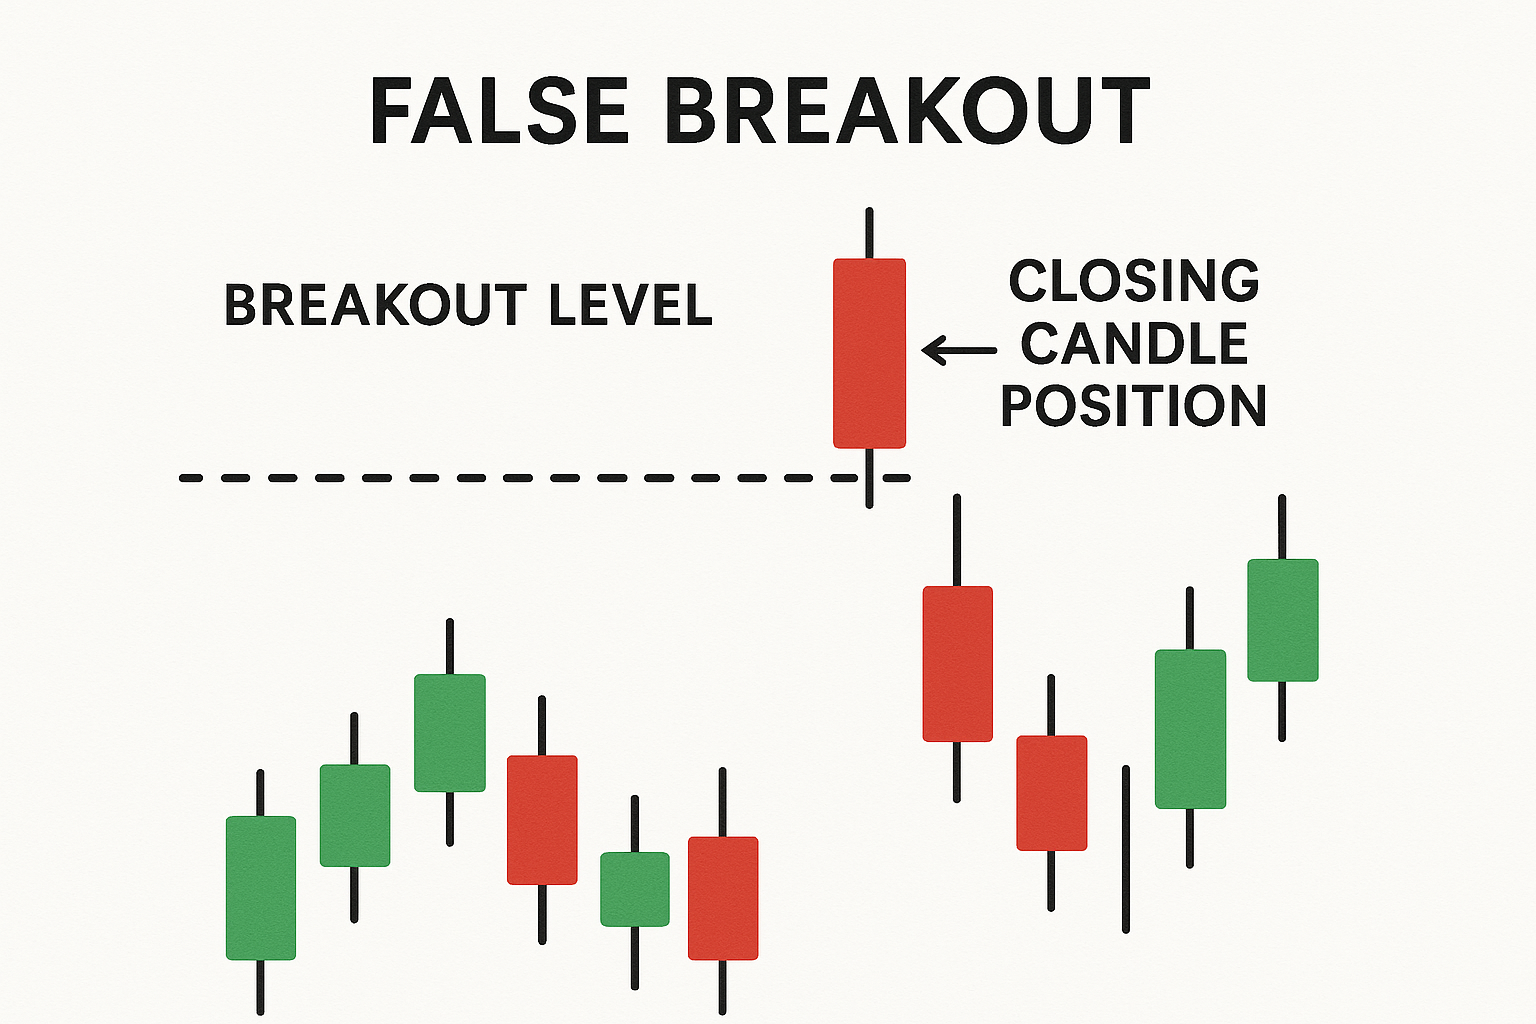
False breaks typically occur when price pokes through a boundary, triggers stops and breakout orders, then swiftly reverses and closes back inside the prior range. This is a trap: the move beyond the level lacked acceptance. Recognizing these dynamics and resisting impulse entries dramatically improves outcomes.
How to Spot a False Breakout (The “Trap”)
Key characteristics:
- Close back inside: A candle that pushes beyond the level but closes back within the prior structure is a primary warning. The longer the upper wick on a failed upside break (or lower wick on a failed downside break), the stronger the rejection signal.
- One-candle wonder: Breakout consists of a single large candle with no follow-through. If the next candle immediately retraces most of it, be cautious.
- Multiple spikes: Repeated quick probes beyond the level with little sustained trading outside indicates a liquidity sweep rather than acceptance.
- Retest failure: After an initial push and pullback, price cannot hold the level on the retest. A close through the opposite side invalidates the breakout thesis.
- Context cues: Occurring into a higher-timeframe opposing level or during low-liquidity periods (late New York, pre-Asia) increases failure rates.
Actionable response:
- Do not enter on the first break. Wait for a close outside and a controlled retest.
- If a retest forms but closes back through the level, cancel the setup; treat it as a failed breakout.
Risk Management for False Breaks
Risk is controlled before entry:
- Stop placement: Always position your stop on the other side of the broken level. If long after a resistance break, the stop belongs below the reclaimed area; if short after a support break, it belongs above. This one rule limits damage from shallow pushes and small shakeouts.
- Position sizing: Base position size on stop distance and a fixed risk budget per trade. Maintain consistency (e.g., 0.5% per trade) to smooth the equity curve.
- Patience over aggression: The urge to “catch the move” is exactly what false breaks exploit. Require both the close and the retest confirmation. Skipping marginal setups is profitable over a sample of trades.
- News discipline: Avoid initiating breakout trades just before major economic releases. Spikes can invalidate technical levels quickly or create artificial breaks.
- Trade invalidation: If price closes back inside the prior range after your entry, exit decisively. Do not widen stops beyond the level—accept the loss and reassess.
- Journaling: Capture screenshots of failed and successful breaks. Patterns in timing, pairs, and session behavior will refine your filters.
Common Breakout Patterns in Forex
Patterns describe the structure that frames a pending imbalance. The underlying principles—level quality, decisive break, retest confirmation, and risk controls—apply across patterns. The difference lies in how the level forms and how targets are estimated.
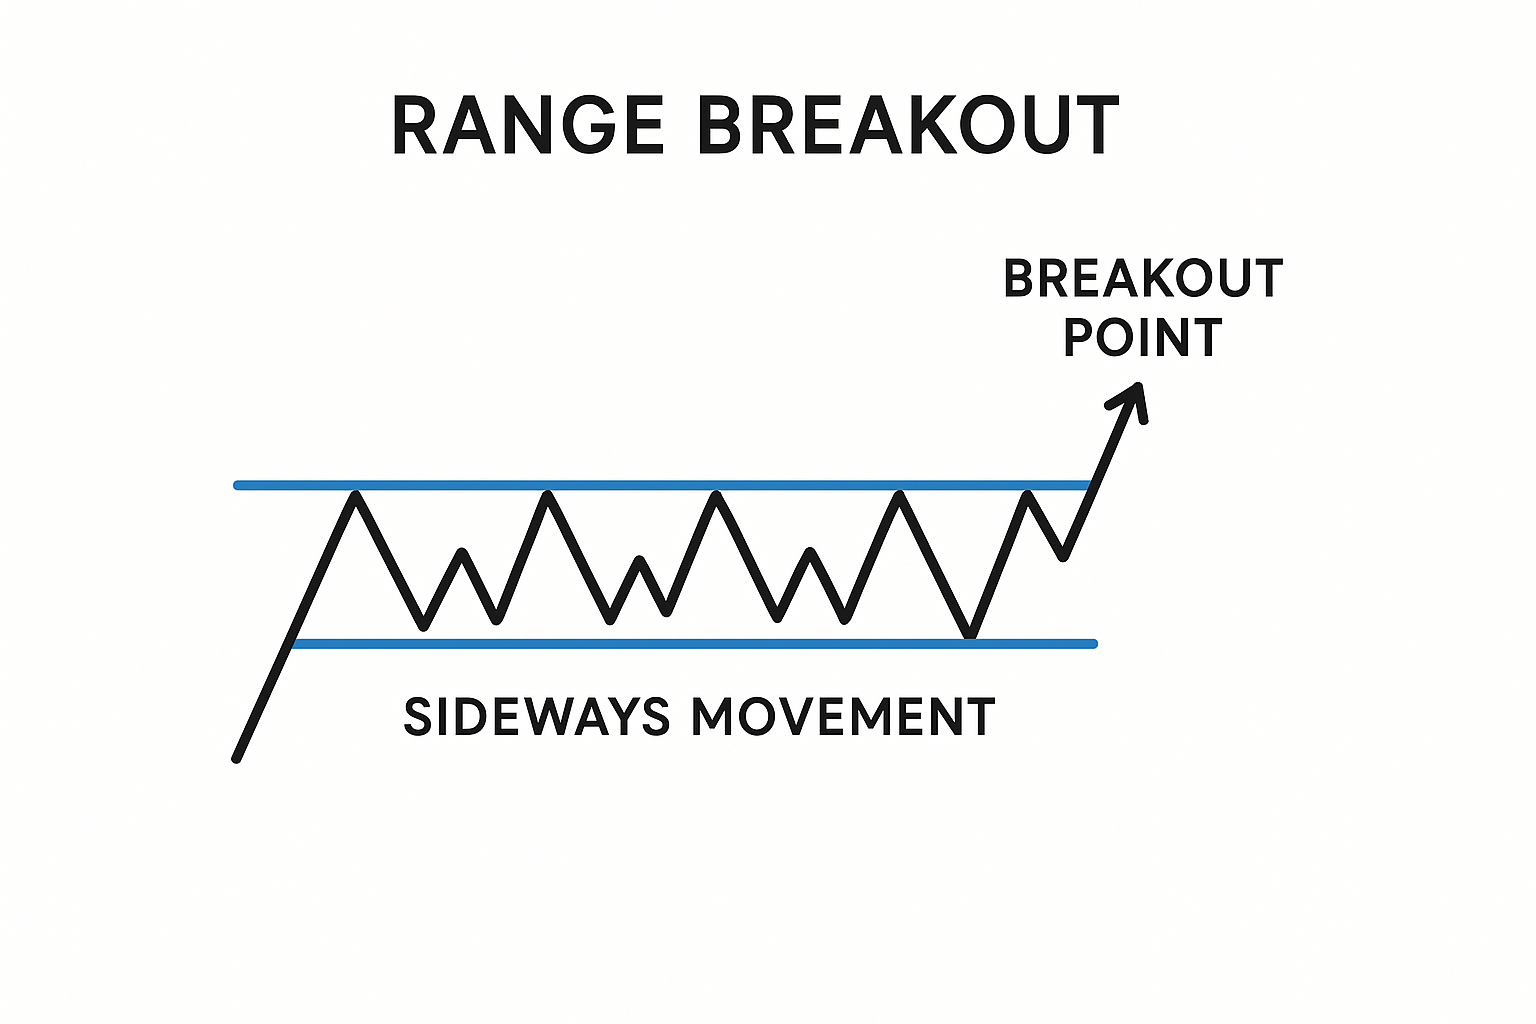
Range Breakout Strategy (Range Breakout Forex / Volatility Breakout Forex)
A range is a horizontal consolidation where price oscillates between a well-defined ceiling and floor. The range breakout forex method targets the moment price accepts outside the range boundary and transitions into a trend. Because ranges compress volatility, subsequent expansions can be meaningful—hence the relevance to volatility breakout forex logic.
Execution framework:
- Define the box: Mark the range high and low after at least two clear touches on each boundary. The tighter and cleaner the range, the better.
- Wait for acceptance: Require a close outside the box. A mere wick poke isn’t enough.
- Retest and confirm: The highest-probability entry is at the throwback/pullback to the broken boundary with a confirmation candle.
- Stops: Place beyond the opposite side of the broken boundary or just beyond the reclaimed line, depending on volatility and the width of the range.
- Targets: A common objective is the height of the range projected from the breakout point. Additionally, use nearby structure (prior swing levels) as interim targets.
Filters and notes:
- Volatility expansion (manual): A clear increase in candle range and follow-through after the break—compared to the prior consolidation—suggests genuine initiative.
- Session timing: Ranges formed during Asia often resolve with European or early U.S. liquidity; align entries with those windows when possible.
- Avoid mid-range entries: If you miss the retest, chasing mid-run is lower quality. Wait for fresh consolidation or stand aside.
Triangle and Wedge Breakouts (Triangle Breakout Forex)
Triangles and wedges compress price action via converging trendlines. In a triangle breakout forex setup, the market stores energy as ranges narrow, then releases it when one side gains conviction.
Key types:
- Symmetrical triangle: Lower highs and higher lows; direction ambiguous until break. Measure the widest part and project from the breakout.
- Ascending triangle: Flat resistance with rising lows; slight bullish bias. Breakouts often retest the flat top as support.
- Descending triangle: Flat support with falling highs; slight bearish bias. Retests of the flat floor as resistance are common.
- Wedges: Rising wedge (bearish bias) and falling wedge (bullish bias) show compression with a directional lean. Treat the wedge boundary like a level for break-and-retest logic.
Execution notes:
- Validate the pattern: Require at least two touches per boundary and visible compression.
- Decisive break and retest: The first close outside the boundary sets the stage; the throwback/pullback provides the entry opportunity.
- Invalidation: A close back inside the triangle/wedge after entry is a warning; manage exposure tightly.
- Targets: Use measured moves (pattern height) and structure targets. Adjust expectations if the break occurs very late near the apex (often weaker).
The London Breakout Strategy (London Breakout Strategy)
This intra-day method leverages the surge in liquidity and participation at the European open. The classical template defines the Asian session’s high/low box and plans for a potential break with London volume.
Core process:
- Mark the Asian session range on M15–M30, typically from the start of Asia to just before London open.
- Wait for a London session close outside the box. Avoid pre-empting on the first minute’s spike.
- Prefer the break-and-retest execution: after the close outside, wait for a pullback to the box edge and a confirmation candle before entering.
- Stops: Place on the other side of the broken boundary; adjust for pair-specific spreads and volatility at the open.
- Targets: Use range projection (height of the Asian box) and nearby structure. Consider partials at 1:1 and let a remainder run if momentum persists.
Risk and nuance:
- High-impact European data releases can distort the open. Filter out days with immediate major news.
- Not every London open ranges cleanly. If the Asian box is messy or the pair is at a significant higher-timeframe level, expect more traps.
- Discipline over automation: The basic strategy is widely known; the edge is in confirmation and risk control, not in blind stop orders.
Want to know when the Elirox bot is active and which trading sessions it covers? See: What are trading hours.
Conclusion: Discipline and Patience in Breakout Trading
A forex breakout strategy is not about chasing the first candle through a line—it is about verifying that the market has accepted new territory and can defend it. The professional pathway is clear: define clean levels, require a decisive close outside, wait for the retest, and demand confirmation before committing risk. Place the stop loss on the other side of the broken level every time.
False breaks are common and will remain so. The antidote is process: patience at the level, objective confirmation signals, and consistent position sizing. Whether you trade ranges, triangles, or session-based approaches, the principles do not change. Treat the breakout as the beginning of your analysis, not the end, and let discipline—not impulse—drive your decisions.
Want to explore automated trading strategies in a risk-free environment first? Start with $10,000 in virtual funds: How to use a demo account.
Disclaimer: This article is for educational purposes only and does not constitute financial advice.